Your success in AZ-100 Study Guides is our sole target and we develop all our AZ-100 Exam Questions and Answers in a way that facilitates the attainment of this target. Not only is our AZ-100 Exam Questions and Answers material the best you can find, it is also the most detailed and the most updated. AZ-100 Dumps for Microsoft AZ-100 are written to the highest standards of technical accuracy.
Microsoft AZ-100 Free Dumps Questions Online, Read and Test Now.
NEW QUESTION 1
Your company has an Azure subscription named Subscription1.
The company also has two on-premises servers named Server1 and Server2 that run Windows Server 2021. Server1 is configured as a DNS server that has a primary DNS zone named adatum.com. Adatum.com contains 1,000 DNS records.
You manage Server1 and Subscription1 from Server2. Server2 has the following tools installed:  The DNS Manager console Azure PowerShell Azure CLI 2.0
You need to move the adatum.com zone to Subscription1. The solution must minimize administrative effort. What should you use?
- A. Azure PowerShell
- B. Azure CLI
- C. the Azure portal
- D. the DNS Manager console
Answer: B
Explanation: Azure DNS supports importing and exporting zone files by using the Azure command-line interface (CLI). Zone file import is not currently supported via Azure PowerShell or the Azure portal.
References: https://docs.microsoft.com/en-us/azure/dns/dns-import-export
NEW QUESTION 2
You have two Azure virtual machines named VM1 and VM2. VM1 has a single data disk named Disk1. You need to attach Disk1 to VM2. The solution must minimize downtime for both virtual machines.
Which four actions should you perform in sequence? To answer, move the appropriate actions from the list of actions to the answer area and arrange them in the correct order.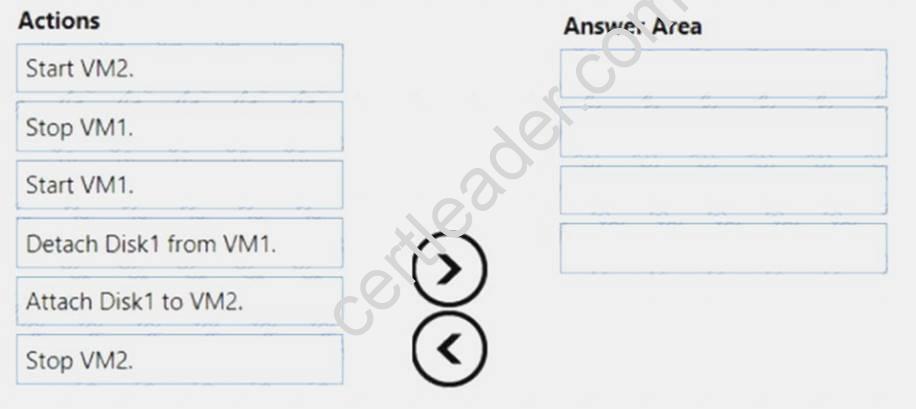
Answer:
Explanation: Step 1: Stop VM1.
Step 2: Detach Disk1 from VM1. Step 3: Start VM1.
Detach a data disk using the portal In the left menu, select Virtual Machines.
 In the virtual machine pane, select Disks. At the top of the Disks pane, select Edit. In the Disks pane, to the far right of the data disk that you would like to detach, click the Detach button image detach button. After the disk has been removed, click Save on the top of the pane. In the virtual machine pane, click Overview and then click the Start button at the top of the pane to restart the VM. The disk stays in storage but is no longer attached to a virtual machine. Step 4: Attach Disk1 to VM2
Attach an existing disk
Follow these steps to reattach an existing available data disk to a running VM. Select a running VM for which you want to reattach a data disk. From the menu on the left, select Disks. Select Attach existing to attach an available data disk to the VM. From the Attach existing disk pane, select OK.
References:
https://docs.microsoft.com/en-us/azure/virtual-machines/windows/detach-disk https://docs.microsoft.com/en-us/azure/lab-services/devtest-lab-attach-detach-data-disk
NEW QUESTION 3
You are planning the move of App1 to Azure. You create a network security group (NSG).
You need to recommend a solution to provide users with access to App1. What should you recommend?
- A. Create an outgoing security rule for port 443 from the Interne
- B. Associate the NSG to all the subnets.
- C. Create an incoming security rule for port 443 from the Interne
- D. Associate the NSG to all the subnets.
- E. Create an incoming security rule for port 443 from the Interne
- F. Associate the NSG to the subnet that contains the web servers.
- G. Create an outgoing security rule for port 443 from the Interne
- H. Associate the NSG to the subnet thatcontains the web servers.
Answer: C
Explanation: As App1 is public-facing we need an incoming security rule, related to the access of the web servers. Scenario: You have a public-facing application named App1. App1 is comprised of the following three tiers: a SQL database, a web front end, and a processing middle tier.
Each tier is comprised of five virtual machines. Users access the web front end by using HTTPS only.
NEW QUESTION 4
Which blade should you instruct the finance department auditors to use?
- A. invoices
- B. partner information
- C. cost analysis
- D. External services
Answer: A
NEW QUESTION 5
You need to prepare the environment to ensure that the web administrators can deploy the web apps as quickly as possible.
Which three actions should you perform in sequence? To answer, move the appropriate actions from the list of actions to the answer area and arrange them in the correct order.
Answer:
Explanation: Step 1:
First you create a storage account using the Azure portal. Step 2:
Select Automation options at the bottom of the screen. The portal shows the template on the Template tab. Deploy: Deploy the Azure storage account to Azure.
Step 3:
Share the template.
Scenario: Web administrators will deploy Azure web apps for the marketing department. Each web app will be added to a separate resource group. The initial configuration of the web apps will be identical. The web administrators have permission to deploy web apps to resource groups.
References:
https://docs.microsoft.com/en-us/azure/azure-resource-manager/resource-manager-quickstart-create-templates-u
NEW QUESTION 6
You have an Azure subscription that is used by four departments in your company. The subscription contains 10 resource groups. Each department uses resources in several resource groups.
You need to send a report to the finance department. The report must detail the costs for each department. Which three actions should you perform in sequence? To answer, move the appropriate actions from the list of actions to the answer area and arrange them in the correct order.
Answer:
Explanation: Box 1: Assign a tag to each resource.
You apply tags to your Azure resources giving metadata to logically organize them into a taxonomy. After you apply tags, you can retrieve all the resources in your subscription with that tag name and value. Each resource or resource group can have a maximum of 15 tag name/value pairs. Tags applied to the resource group are not inherited by the resources in that resource group.
Box 2: From the Cost analysis blade, filter the view by tag
After you get your services running, regularly check how much they're costing you. You can see the current spend and burn rate in Azure portal. Visit the Subscriptions blade in Azure portal and select a subscription. You should see the cost breakdown and burn rate in the popup blade. Click Cost analysis in the list to the left to see the cost breakdown by resource. Wait 24 hours after you add a service for the data to populate. You can filter by different properties like tags, resource group, and timespan. Click Apply to confirm the filters and Download if you want to export the view to a Comma-Separated Values (.csv) file.
Box 3: Download the usage report References:
https://docs.microsoft.com/en-us/azure/azure-resource-manager/resource-group-using-tags https://docs.microsoft.com/en-us/azure/billing/billing-getting-started
NEW QUESTION 7
Click to expand each objective. To connect to the Azure portal, type https://portal.azure.com in the browser address bar.

When you are finished performing all the tasks, click the ‘Next’ button.
Note that you cannot return to the lab once you click the ‘Next’ button. Scoring occur in the background while you complete the rest of the exam.
Overview
The following section of the exam is a lab. In this section, you will perform a set of tasks in a live environment. While most functionality will be available to you as it would be in a live environment, some functionality (e.g., copy and paste, ability to navigate to external websites) will not be possible by design. Scoring is based on the outcome of performing the tasks stated in the lab. In other words, it doesn’t matter how you accomplish the task, if you successfully perform it, you will earn credit for that task.
Labs are not timed separately, and this exam may have more than one lab that you must complete. You can use as much time as you would like to complete each lab. But, you should manage your time appropriately to ensure that you are able to complete the lab(s) and all other sections of the exam in the time provided.
Please note that once you submit your work by clicking the Next button within a lab, you will NOT be able to return to the lab.
To start the lab
You may start the lab by clicking the Next button.
You need to allow RDP connections over TCP port 3389 to VM1 from the internet. The solution must prevent connections from the Internet over all other TCP ports.
What should you do from the Azure portal?
Answer:
Explanation: Step 1: Create a new network security group Step 2: Select your new network security group.
Step 3: Select Inbound security rules, . Under Add inbound security rule, enter the following
Destination: Select Network security group, and then select the security group you created previously. Destination port ranges: 3389
Protocol: Select TCP
References: https://docs.microsoft.com/en-us/azure/virtual-network/tutorial-filter-network-traffic
NEW QUESTION 8
You have an Azure subscription.
You plan to use Azure Resource Manager templates to deploy 50 Azure virtual machines that will be part of the same availability set.
You need to ensure that as many virtual machines as possible are available if the fabric fails or during servicing.
How should you configure the template? To answer, select the appropriate options in the answer area.
NOTE: Each correct selection is worth one point.
Select two alternatives below.
- A. platformFaultDomainCount: 0
- B. platformFaultDomainCount: 1
- C. platformFaultDomainCount: 2
- D. platformFaultDomainCount: 3
- E. platformFaultDomainCount: 4
- F. platformUpdateDomainCount: 10
- G. platformUpdateDomainCount: 20
- H. platformUpdateDomainCount: 25
- I. platformUpdateDomainCount: 30
- J. platformUpdateDomainCount: 40
- K. platformUpdateDomainCount: 50
Answer: CG
Explanation: Use two fault domains.
2 or 3 is max, depending on which region you are in. Use 20 for platformUpdateDomainCount
Increasing the update domain (platformUpdateDomainCount) helps with capacity and availability planning when the platform reboots nodes. A higher number for the pool (20 is max) means that fewer of their nodes in any given availability set would be rebooted at once.
References:
https://www.itprotoday.com/microsoft-azure/check-if-azure-region-supports-2-or-3-fault-domains-managed-disk https://github.com/Azure/acs-engine/issues/1030
NEW QUESTION 9
Note: This question is part of a series of questions that present the same scenario. Each question in the series contains a unique solution that might meet the stated goals. Some question sets might have more than one correct solution, while others might not have a correct solution.
After you answer a question in this section, you will NOT be able to return to it. As a result, these questions will not appear in the review screen.
You have an Azure subscription that contains 10 virtual networks. The virtual networks are hosted in separate resource groups.
Another administrator plans to create several network security groups (NSGs) in the subscription.
You need to ensure that when an NSG is created, it automatically blocks TCP port 8080 between the virtual networks.
Solution: You create a resource lock, and then you assign the lock to the subscription. Does this meet the goal?
- A. Yes
- B. No
Answer: B
Explanation: How can I freeze or lock my production/critical Azure resources from accidental deletion? There is way to do this with both ASM and ARM resources using Azure resource lock.
References:
https://blogs.msdn.microsoft.com/azureedu/2021/04/27/using-azure-resource-manager-policy-and-azure-lock-to
NEW QUESTION 10
You have an availability set named AS1 that contains three virtual machines named VM1, VM2, and VM3. You attempt to reconfigure VM1 to use a larger size. The operation fails and you receive an allocation failure message.
You need to ensure that the resize operation succeeds.
Which three actions should you perform in sequence? To answer, move the appropriate actions from the list of actions to the answer area and arrange them in the correct order.
Answer:
Explanation: 
NEW QUESTION 11
You need to move the blueprint files to Azure. What should you do?
- A. Generate a shared access signature (SAS). Map a drive, and then copy the files by using File Explorer.
- B. Use the Azure Import/Export service.
- C. Generate an access ke
- D. Map a drive, and then copy the files by using File Explorer.
- E. Use Azure Storage Explorer to copy the files.
Answer: D
Explanation: Azure Storage Explorer is a free tool from Microsoft that allows you to work with Azure Storage data on Windows, macOS, and Linux. You can use it to upload and download data from Azure blob storage.
Scenario:
Planned Changes include: move the existing product blueprint files to Azure Blob storage. Technical Requirements include: Copy the blueprint files to Azure over the Internet. References:
https://docs.microsoft.com/en-us/azure/machine-learning/team-data-science-process/move-data-to-azure-blob-us
NEW QUESTION 12
You create a virtual machine scale set named Scale1. Scale1 is configured as shown in the following exhibit.
Use the drop-down menus to select the answer choice that completes each statement based on the information presented in the graphic.
Answer:
Explanation: Box 1:
The Autoscale scale out rule increases the number of VMs by 2 if the CPU threshold is 80% or higher. The initial instance count is 4 and rises to 6 when the 2 extra instances of VMs are added.
Box 2:
The Autoscale scale in rule decreases the number of VMs by 4 if the CPU threshold is 30% or lower. The initial instance count is 4 and thus cannot be reduced to 0 as the minimum instances is set to 2. Instances are only added when the CPU threshold reaches 80%.
References:
https://docs.microsoft.com/en-us/azure/azure-monitor/platform/autoscale-overview https://docs.microsoft.com/en-us/azure/azure-monitor/platform/autoscale-best-practices https://docs.microsoft.com/en-us/azure/azure-monitor/platform/autoscale-common-scale-patterns
NEW QUESTION 13
Overview
The following section of the exam is a lab. In this section, you will perform a set of tasks in a live environment. While most functionality will be available to you as it would be in a live environment, some functionality (e.g., copy and paste, ability to navigate to external websites) will not be possible by design.
Scoring is based on the outcome of performing the tasks stated in the lab. In other words, it doesn’t matter how you accomplish the task, if you successfully perform it, you will earn credit for that task.
Labs are not timed separately, and this exam may have more than one lab that you must complete. You can use as much time as you would like to complete each lab. But, you should manage your time appropriately to ensure that you are able to complete the lab(s) and all other sections of the exam in the time provided.
Please note that once you submit your work by clicking the Next button within a lab, you will NOT be able to return to the lab.
To start the lab
You may start the lab by clicking the Next button.
You plan to allow connections between the VNET01-USEA2 and VNET01-USWE2 virtual networks.
You need to ensure that virtual machines can communicate across both virtual networks by using their private IP address. The solution must NOT require any virtual network gateways.
What should you do from the Azure portal?
Answer:
Explanation: Virtual network peering enables you to seamlessly connect two Azure virtual networks. Once peered, the virtual networks appear as one, for connectivity purposes.
Peer virtual networks
Step 1. In the Search box at the top of the Azure portal, begin typing VNET01-USEA2. When VNET01-USEA2 appears in the search results, select it.
Step 2. Select Peerings, under SETTINGS, and then select + Add, as shown in the following picture:
Step 3. Enter, or select, the following information, accept the defaults for the remaining settings, and then select OK.
Name: myVirtualNetwork1-myVirtualNetwork2 (for example) Subscription: elect your subscription.
Virtual network: VNET01-USWE2 - To select the VNET01-USWE2 virtual network, select Virtual network, then select VNET01-USWE2. You can select a virtual network in the same region or in a different region.
Now we need to repeat steps 1-3 for the other network VNET01-USWE2:
Step 4. In the Search box at the top of the Azure portal, begin typing VNET01- USEA2. When VNET01- USEA2 appears in the search results, select it.
Step 5. Select Peerings, under SETTINGS, and then select + Add. References:
https://docs.microsoft.com/en-us/azure/virtual-network/tutorial-connect-virtual-networks-portal
NEW QUESTION 14
Click to expand each objective. To connect to the Azure portal, type https://portal.azure.com in the browser address bar.
When you are finished performing all the tasks, click the ‘Next’ button.
Note that you cannot return to the lab once you click the ‘Next’ button. Scoring occur in the background while you complete the rest of the exam.
Overview
The following section of the exam is a lab. In this section, you will perform a set of tasks in a live environment. While most functionality will be available to you as it would be in a live environment, some functionality (e.g., copy and paste, ability to navigate to external websites) will not be possible by design. Scoring is based on the outcome of performing the tasks stated in the lab. In other words, it doesn’t matter how you accomplish the task, if you successfully perform it, you will earn credit for that task.
Labs are not timed separately, and this exam may have more than one lab that you must complete. You can use as much time as you would like to complete each lab. But, you should manage your time appropriately to ensure that you are able to complete the lab(s) and all other sections of the exam in the time provided.
Please note that once you submit your work by clicking the Next button within a lab, you will NOT be able to return to the lab.
To start the lab
You may start the lab by clicking the Next button.
You plan to configure VM1 to be accessible from the Internet.
You need to add a public IP address to the network interface used by VM1. What should you do from Azure portal?
Answer:
Explanation: You can add private and public IP addresses to an Azure network interface by completing the steps that follow.
Step 1: In Azure portal, click More services > type virtual machines in the filter box, and then click Virtual machines.
Step 2: In the Virtual machines pane, click the VM you want to add IP addresses to. Click Network interfaces in the virtual machine pane that appears, and then select the network interface you want to add the IP addresses to. In the example shown in the following picture, the NIC named myNIC from the VM named myVM is selected:
Step 3: In the pane that appears for the NIC you selected, click IP configurations. Step 4: Click Create public IP address.
Step 5: In the Create public IP address pane that appears, enter a Name, select an IP address assignment type, a Subscription, a Resource group, and a Location, then click Create, as shown in the following picture:
References:
https://docs.microsoft.com/en-us/azure/virtual-network/virtual-network-multiple-ip-addresses-portal
NEW QUESTION 15
You have an Azure subscription named Subscription1 that is used be several departments at your company. Subscription1 contains the resources in the following table: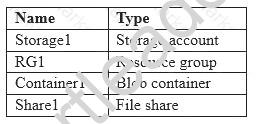
Another administrator deploys a virtual machine named VM1 and an Azure Storage account named Storage2 by using a single Azure Resource Manager template.
You need to view the template used for the deployment.
From which blade can you view the template that was used for the deployment?
- A. RG1
- B. VM1
- C. Storage1
- D. Container1
Answer: A
Explanation: 1. View template from deployment history
Go to the resource group for your new resource group. Notice that the portal shows the result of the last
deployment. Select this link.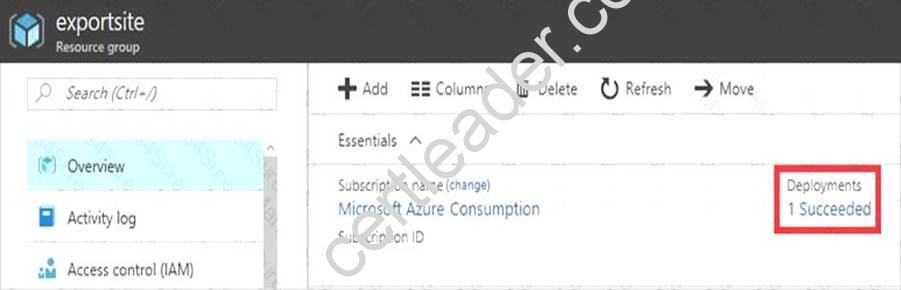
2. You see a history of deployments for the group. In your case, the portal probably lists only one deployment. Select this deployment.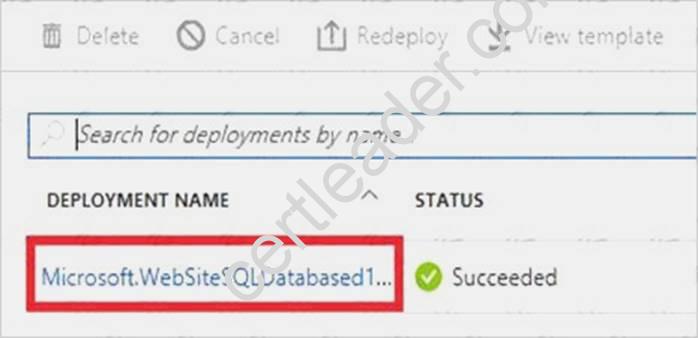
The portal displays a summary of the deployment. The summary includes the status of the deployment and its operations and the values that you provided for parameters. To see the template that you used for the deployment, select View template.
References:
https://docs.microsoft.com/en-us/azure/azure-resource-manager/resource-manager-export-template
NEW QUESTION 16
You have a virtual network named VNet1 that has the configuration shown in the following exhibit.
Use the drop-down menus to select the answer choice that completes each statement based on the information presented in the graphic.
NOTE: Each correct selection is worth one point.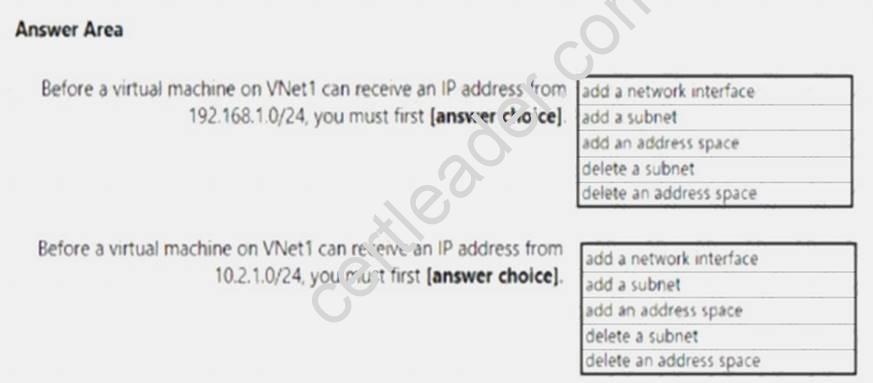
Answer:
Explanation: Box 1: add a subnet
Your IaaS virtual machines (VMs) and PaaS role instances in a virtual network automatically receive a private IP address from a range that you specify, based on the subnet they are connected to. We need to add the 192.168.1.0/24 subnet.
Box 2: add a network interface
The 10.2.1.0/24 network exists. We need to add a network interface. References:
https://docs.microsoft.com/en-us/azure/virtual-network/virtual-networks-static-private-ip-arm-pportal
NEW QUESTION 17
Click to expand each objective. To connect to the Azure portal, type https://portal.azure.com in the browser
address bar.

When you are finished performing all the tasks, click the ‘Next’ button.
Note that you cannot return to the lab once you click the ‘Next’ button. Scoring occur in the background while you complete the rest of the exam.
Overview
The following section of the exam is a lab. In this section, you will perform a set of tasks in a live environment. While most functionality will be available to you as it would be in a live environment, some functionality (e.g., copy and paste, ability to navigate to external websites) will not be possible by design. Scoring is based on the outcome of performing the tasks stated in the lab. In other words, it doesn’t matter how you accomplish the task, if you successfully perform it, you will earn credit for that task.
Labs are not timed separately, and this exam may have more than one lab that you must complete. You can use as much time as you would like to complete each lab. But, you should manage your time appropriately to ensure that you are able to complete the lab(s) and all other sections of the exam in the time provided.
Please note that once you submit your work by clicking the Next button within a lab, you will NOT be able to return to the lab.
To start the lab
You may start the lab by clicking the Next button.
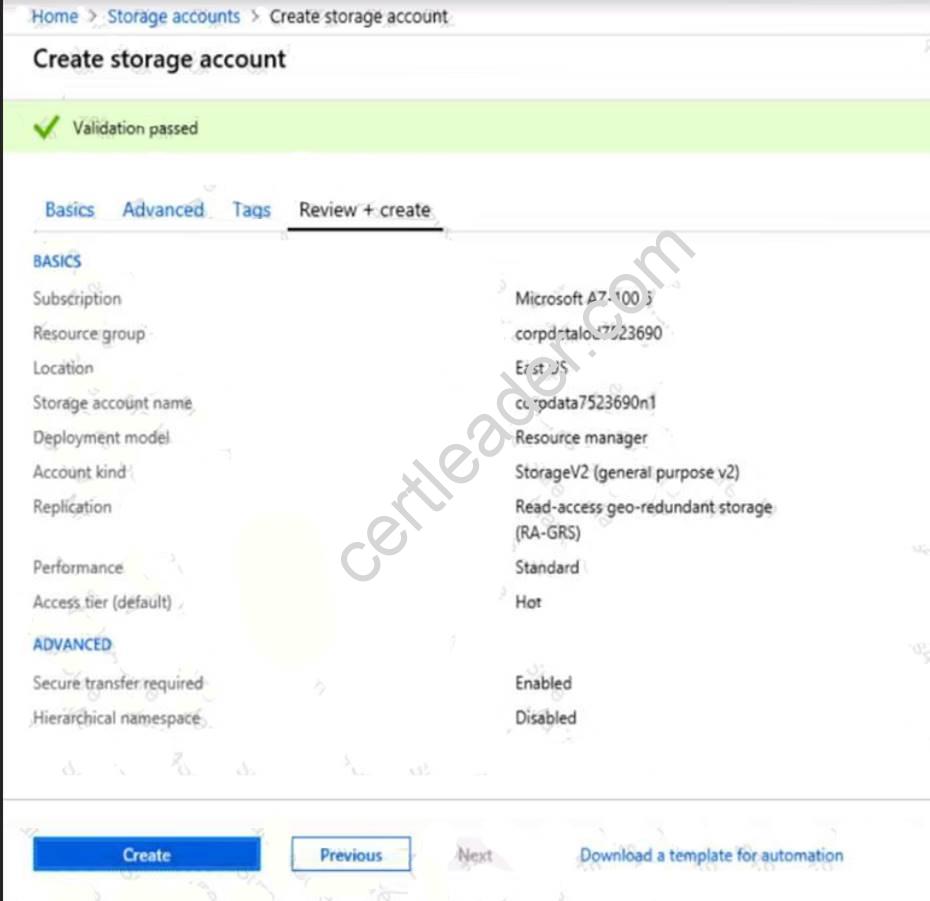
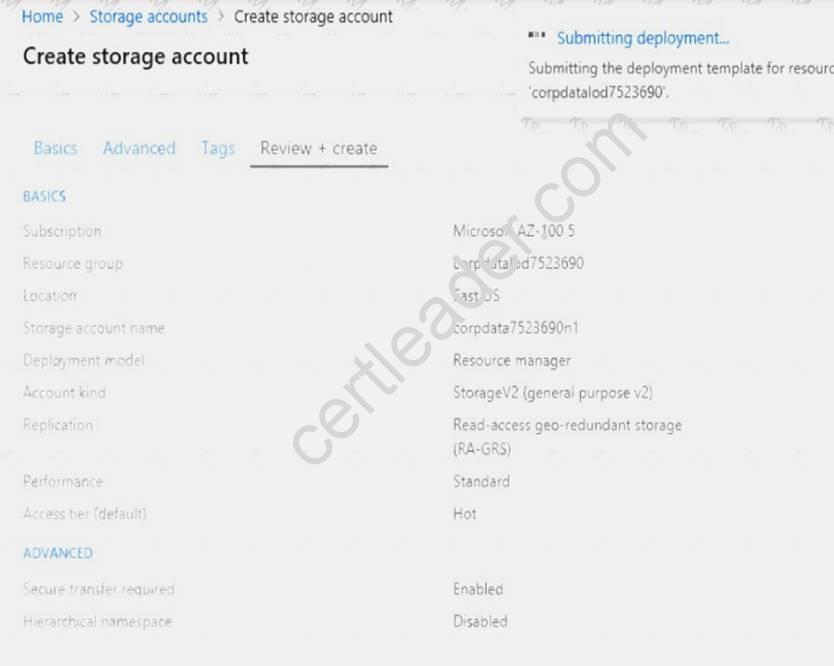
You plan to move backup files and documents from an on-premises Windows file server to Azure Storage. The backup files will be stored as blobs.
You need to create a storage account named corpdata7523690n2. The solution must meet the following requirements: Ensure that the documents are accessible via drive mappings from Azure virtual machines that run Windows Server 2021. Provide the highest possible redundancy for the documents. Minimize storage access costs.
What should you do from the Azure portal?
Answer:
Explanation: Step 1: In the Azure portal, click All services. In the list of resources, type Storage Accounts. As you begin typing, the list filters based on your input. Select Storage Accounts.
Step 2: On the Storage Accounts window that appears, choose Add. Step 3: Select the subscription in which to create the storage account.
Step 4: Under the Resource group field, select Create New. Create a new Resource
Step 5: Enter a name for your storage account: corpdata7523690n2
Step 6: For Account kind select: General-purpose v2 accounts (recommended for most scenarios)
General-purpose v2 accounts is recommended for most scenarios. . General-purpose v2 accounts deliver the lowest per-gigabyte capacity prices for Azure Storage, as well as industry-competitive transaction prices.
Step 7: For replication select: Read-access geo-redundant storage (RA-GRS)
Read-access geo-redundant storage (RA-GRS) maximizes availability for your storage account. RA-GRS provides read-only access to the data in the secondary location, in addition to geo-replication across two regions.
References:
https://docs.microsoft.com/en-us/azure/storage/common/storage-quickstart-create-account https://docs.microsoft.com/en-us/azure/storage/common/storage-account-overview
NEW QUESTION 18
You have an Azure subscription named Subscription1. Subscription1 contains a virtual machine named VM1. You install and configure a web server and a DNS server on VM1.
VM1 has the effective network security rules shown in the following exhibit.
Use the drop-down menus to select the answer choice that completes each statement based on the information presented in the graphic.
NOTE: Each correct selection is worth one point.
Answer:
Explanation: 
NEW QUESTION 19
You need to meet the user requirement for Admin1. What should you do?
- A. From the Subscriptions blade, select the subscription, and then modify the Properties.
- B. From the Subscriptions blade, select the subscription, and then modify the Access control (IAM) settings.
- C. From the Azure Active Directory blade, modify the Properties.
- D. From the Azure Active Directory blade, modify the Groups.
Answer: A
Explanation: Change the Service administrator for an Azure subscription
Sign in to Account Center as the Account administrator.
Select a subscription.
On the right side, select Edit subscription details.
Scenario: Designate a new user named Admin1 as the service administrator of the Azure subscription. References:
https://docs.microsoft.com/en-us/azure/billing/billing-add-change-azure-subscription-administrator
Thanks for reading the newest AZ-100 exam dumps! We recommend you to try the PREMIUM 2passeasy AZ-100 dumps in VCE and PDF here: https://www.2passeasy.com/dumps/AZ-100/ (106 Q&As Dumps)